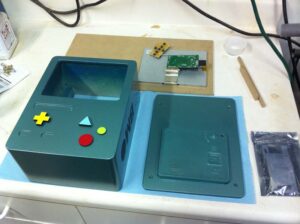
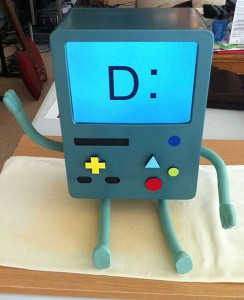
 Finally it’s time to finish BMO. The first challenge was to find out what exactly BMO’s color really is. In the show he seems to take on some shade of green. Just doing an image search on “BMO” should give you a fair sampling of the shades. It looks like the variations are due to the artist shadowing BMO. I didn’t want to mix my own color because I just wanted to get a can of spray paint. A trip to the hardware store resulted in very few “BMO” colors.
I grabbed a can the sort of looked BMO-ish and gave it a try. I also grabbed a can of sand-able primer. This is important for a nice smooth finish. MDF is already pretty smooth and doesn’t have any grain to raise but it can still use a coat of primer to give it a glass smooth finish. Just spray the body and let it dry according to the instructions then sand it with a fine grit sand paper. I used 400 grit I think. Then add another coat and repeat sanding until you are satisfied with the smoothness. Plus you can see any seams that may need filling at this stage. If they are small enough the primer will fill them in.
Once the primer has dried you can give it your top coat. I sprayed a coat of the blue/green paint that I got at the hardware store but it turned out waaaaay to blue. Those spray can lids never tell the truth :/ At this point I was starting to think I was going to have to break out the airbrush and mix my own color. I went to the hobby store and staring at me in the paint aisle was the perfect match. The Model Master Turquoise Metallic (#2945). Not only did it match BMO but it was metallic. This stuff isn’t the cheapest (because the can is small) but at $5 a can I figured it was still a pretty good deal since it looked like I would only need one can.
 I let the original top coat cure a while since you don’t want to spray on top of uncured paint or it will crack and ruin the finish. I re-primed BMO with the white primer, sanded and the coated with the turquoise. It was still a tad dark. The Model Master sprays are a bit touchy and you need to lay down several light coats. I probably went one coat too much but it’s still within BMO tolerances.
Once the turquoise cured it was time to put “BMO” on the side. I made a masking using, well, masking tape. That blue stuff. It comes in 2″ wide rolls which is good for stencils. I took a laminated shelf which has a smooth surface and laid down two layers of blue tape in alternating directions. The I printed the side panel of the BMO design on heavy card stock and carefully cut out the letters with a hobby knife. I traced the outline of the letters on the masking tape then carefully (as always) cut the letters out of the tape. This left me with a sticky stencil which I could apply to the side of BMO. Once it was firmly tacked down I sprayed a layer of black paint. I used Model Masters black since it puts out a finer spray than the hardware spray cans but I’m sure those would work too. Just don’t go too heavy or it will seep under the tape. Once the paint is set up you can remove the masking. It doens’t have to be totally dry or it my glue the tape to the body. After the paint dries drill holes for BMO’s arms. These holes are centered in the O’s.
Next it was time for the controls. These are just think pieces of MDF cut in to the various shapes BMO uses for his control and painted with hobby paints. These were then hot glued in to place. The cartridge slot was painted black along with the controller slots. BMO was now ready for his clear coat. A couple coats of clear gives BMO that shiny metallic look.
BMO’s arms and legs are just radiator hose that I got from the hardware store. They are painted with an acrylic paint that I mixed to match the body. The hands and feet are made from polymer clay.
 Once your BMO is painted it’s just a matter of loading up the “guts” and making some faces. The LCD is just friction fit in to the case. Some thin foam helps keep it in place. The LCD controller is reconnected to the panel and the back panel is screwed on. The faces are made in Photoshop. They aren’t very complicated so any graphics program should be able to make them. Each image is 800×600.
BMO was a big hit at Fanime and ComicCon. Almost too much so. It was hard to move without someone wanting to take a picture. We even stopped a few autograph sessions at ComicCon when we passed by and the people signing autographs wanted a picture with BMO. He, of course, was very popular at the Cartoon Network booth and wound up in the interview booth for the Cartoon Network birthday celebration. One of the comments we kept hearing from the Cartoon Network people was “has Penn seen this?” which, of course, would have been awesome but we never crossed paths. 🙁
We have lot’s of updates for BMO for ComicCon 2013. Stay tuned…

does his arms and legs move???
Do the arms and legs move and can he speak???
What material is beemo made out of? is it cardstock? cardboard?
B
M
O
Can you make me a BMO it is almost my birthday please.
We are Definitely interested in one of these guys! Where can I purchase one? Thanks!